Many Indian schools have moved past the question of whether to offer robotics. The harder question is how to turn that interest into a lab that students use every week, teachers feel confident running, and management can justify at the next budget review.
That is where most projects succeed or stall. A room full of kits is easy to buy. A working programme needs clear learning goals, a grade-wise pathway, trained teachers, the right equipment and someone to call when a motor fails mid-term.
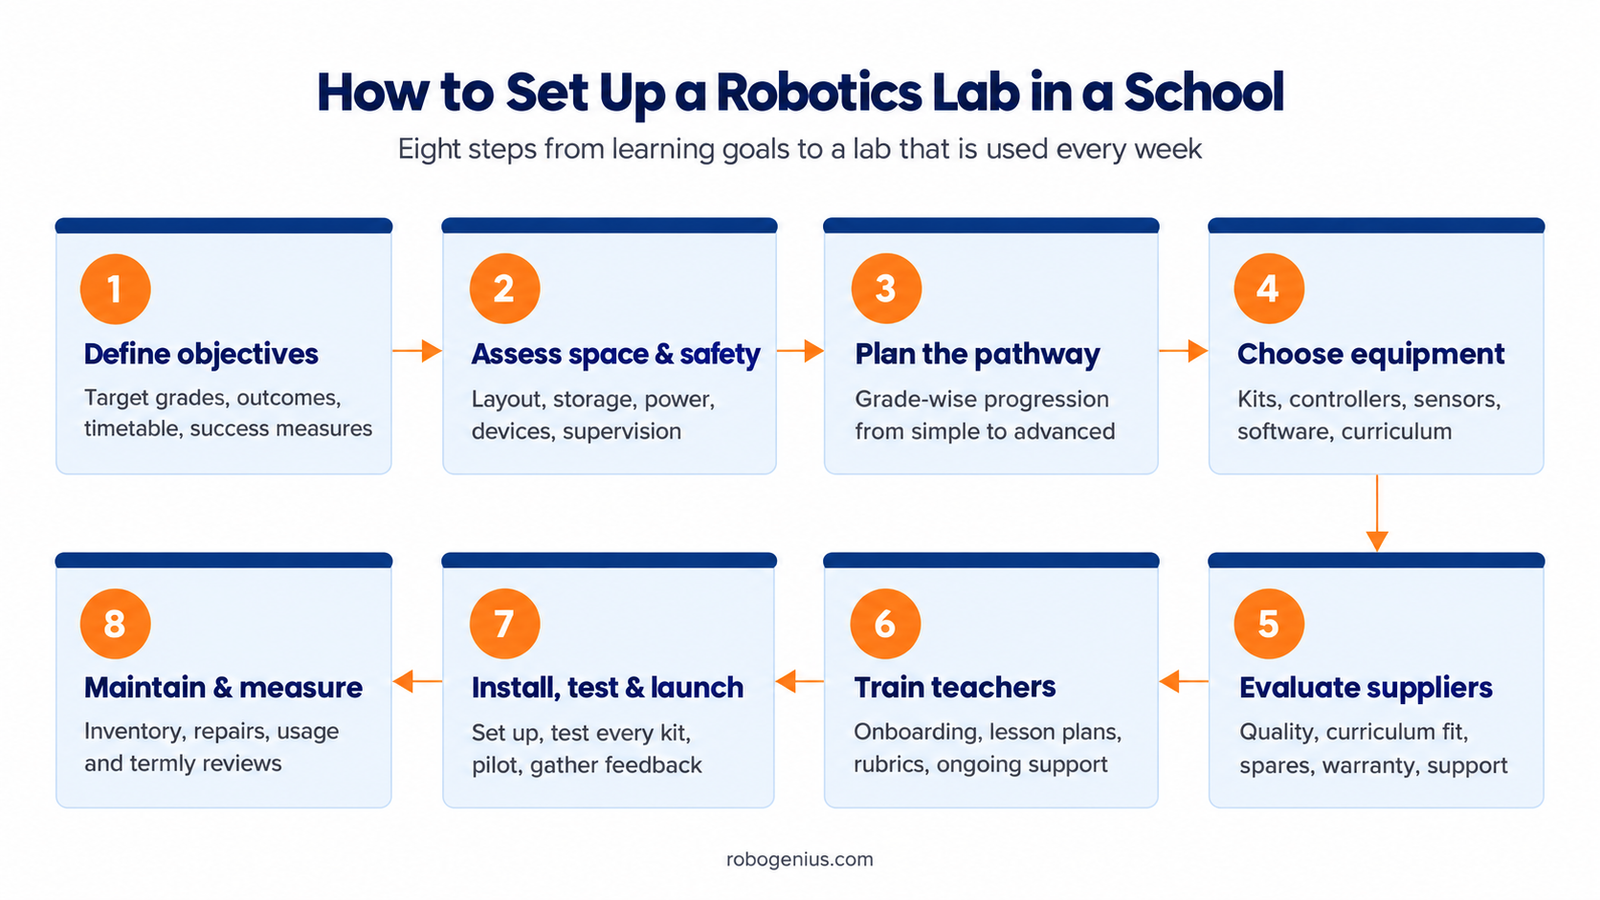
This guide walks school leaders through robotics lab setup for schools in eight practical steps: defining objectives, preparing the space, planning the curriculum, choosing equipment, evaluating suppliers, training teachers, launching and maintaining the lab. It also covers what drives cost, common mistakes and a checklist you can share with your management team.
At RoboGenius, we have helped schools set up STEM, robotics and AI labs since 2006, as an authorised partner for LEGO® Education and Arduino in India. The guidance below is what we would tell any school, whichever provider it chooses.
What Is a School Robotics Lab?
A school robotics lab is a dedicated learning space where students design, build, program and test robots and related systems as part of a planned curriculum. The important words are planned curriculum.
A storage room with robotics kits is not a lab. A functioning lab brings six elements together:
- Hardware: construction sets, controllers, motors, sensors and electronics suited to each age group.
- Software: block-based or text-based coding environments that work with the hardware and the school’s devices.
- Curriculum: sequenced lessons and projects linked to learning outcomes, not one-off activities.
- Projects: open-ended challenges where students apply what they have learnt to real problems.
- Teacher readiness: trained facilitators who can run sessions, troubleshoot and assess learning.
- Maintenance: inventory control, spare parts, software updates and a support arrangement.
If any one of these is missing, utilisation usually drops within a term or two. Planning all six together is what separates a lab from a showroom.
Why Should Schools Invest in a Robotics Lab?
A well-run robotics lab gives students a place to learn by doing. Building and programming a robot asks them to break a problem into steps, test ideas, fail safely and improve, which is computational thinking and engineering design in practice.
The lab also supports skills that are hard to teach from a textbook:
- Coding with an immediate, physical result.
- Engineering design: planning, building, testing and iterating.
- Creativity and collaboration through team projects.
- Applied science and mathematics, such as measurement, speed, angles and circuits.
- Age-appropriate exposure to AI, such as how sensors and simple models help machines make decisions.
Indian policy points in the same direction. The National Education Policy (NEP) 2020 calls coding and computational thinking imperatives and introduces coding in the Middle Stage, Grades 6–8 (Ministry of Education reply in the Rajya Sabha). The Central Board of Secondary Education (CBSE) offers 12–15 hour skill modules for Classes 6–8, including Artificial Intelligence, with 70% of the time set aside for hands-on activity (CBSE Circular 48/2023).
A lab does not guarantee better marks or careers. The benefits depend on good curriculum, regular timetabled use and capable teaching. The rest of this guide is about getting those right.
Step 1 — Define Your School’s Objectives and Target Grades
Start with learning outcomes, not a shopping list. The equipment, space and budget all follow from what you want students to achieve. Agree on answers to these questions with your academic team:
- Which grades will use the lab first?
A Grades 3–5 lab and a Grades 9–12 lab need very different equipment. - How many students will use it, and how often?
Estimate weekly sessions per section and students per session. - Where does it sit in the timetable?
Curricular periods, a skill subject, after-school clubs or all three. - What should students be able to do by the end of each year?
For example, build a simple machine, program a robot to follow a line, or design a sensor-based solution. - Which curriculum links matter?
Science, mathematics, computer science, CBSE skill modules or your board’s equivalent. - Are competitions or exhibitions a goal?
This affects kit choice and project time. - How will you measure success?
Decide now (see Step 8).
Step 2 — Assess Space, Infrastructure and Safety
There is no single mandatory room size for a school robotics lab. The right space depends on group size, the activities planned and how much storage you need. Assess your options against these factors:
- Layout: tables for group work (typically small teams sharing a kit), clear space for testing robots, and room for the teacher to move between groups.
- Storage: lockable cabinets or labelled bins so kits stay complete between sessions. Lost parts are one of the most common reasons kits stop working.
- Power: enough safely placed sockets to charge batteries, controllers and devices without trailing cables.
- Connectivity and devices: check whether the coding software needs internet access, specific operating systems or particular tablets or laptops.
- Display: a projector or interactive panel helps with demonstrations.
- Accessibility: step-free access and adjustable work areas where possible, so every student can take part.
- Supervision and safety: clear rules for handling tools, batteries and small parts; age-appropriate equipment; and a first-aid kit. Supervise any soldering or powered tools closely.
- Inventory: a simple register of every kit and component, checked at set intervals.
If you are converting an existing computer lab or science room, list what can be reused before buying anything new.
Step 3 — Plan a Grade-Wise Robotics Learning Pathway
A strong lab grows with students. Rather than giving every grade the same kit, plan a progression in which each stage builds on the last. One possible pathway:
| Stage | Typical focus | Example activities |
| Early primary | Sequencing, simple mechanisms | Unplugged sequencing games, building simple machines |
| Upper primary | Block-based coding, motors and basic sensors | Programming a model to move, react to touch or light |
| Middle school | Programmable robots, sensors, simple electronics | Line-following robots, basic circuits, design challenges |
| Secondary | Microcontrollers, automation, age-appropriate AI | Sensor-based projects, simple automation, introductory AI concepts |
| Senior secondary | Advanced projects and text-based coding | Open-ended problem-solving, competitions, interdisciplinary projects |
Treat this as a template, not a rule. The right level for each grade depends on student age and prior experience, your board’s curriculum, teacher capacity and the objectives set in Step 1.
The same approach applies if you are planning a broader STEM lab setup for schools or an AI lab setup for schools: decide outcomes grade by grade, then choose equipment.
Step 4 — Choose the Right Robotics Lab Equipment
With outcomes and pathway agreed, you can choose school robotics lab equipment with confidence. Not every lab needs every category below; select what your pathway actually uses.
| Component | Purpose | Selection considerations | Questions to ask the vendor |
| Robotics construction kits | Building robots and mechanisms | Age suitability, durability, reusability, parts per kit | How many students per kit? Are replacement parts sold individually? |
| Controllers or microcontrollers | Run the student’s program | Compatibility with sensors and software, ease of use | Which coding environments does it support? How long will it be supported? |
| Sensors and motors | Let robots sense and move | Range offered, robustness, compatibility across kits | Are add-on sensors compatible with existing kits? |
| Coding software | Write and upload programs | Block and text options, offline use, device compatibility | Is there a licence fee? Does it work on our devices and network? |
| Computers or tablets | Programming and design | Reuse existing devices where possible | What are the minimum device specifications? |
| Electronics and consumables | Circuits, prototyping, project builds | Safety for the age group, ongoing replenishment | Which items need regular restocking, and at what cost? |
| Storage and furniture | Keep kits complete and work areas organised | Labelled storage, sturdy group tables | Is storage included, or quoted separately? |
| Teacher guides and curriculum | Structured lessons and assessments | Alignment with your grades and board | Is curriculum included? Is it editable? How often is it updated? |
| Project and competition materials | Open-ended challenges | Link to your objectives | Do you support competitions or showcases? |
Ask to see the actual kit, not just a brochure. If possible, let a teacher run one sample lesson with it before you commit.
Step 5 — Evaluate Robotics Lab Suppliers and Implementation Partners
The right robotics lab setup company does more than deliver boxes. You are choosing a partner for equipment, curriculum, training and multi-year support. Compare robotics lab suppliers in India on the same criteria, in writing.
Ready to move your students Vendor comparison checklistfrom AI consumers to AI creators?
- Equipment quality, durability and age suitability, checked with a physical sample
- Curriculum fit for your grades, board and timetable
- Compatibility between kits, sensors, software and your existing devices
- Reusability of components across years and batches
- Availability and price of spare parts
- Warranty terms: what is covered, for how long, and how claims are handled
- Installation and setup included, with a clear scope
- Teacher training: format, duration, and support after launch
- Documentation: lesson plans, manuals, assessment rubrics
- Maintenance and support: response time, on-site or remote, escalation contacts
- References from schools of a similar size and board, which you can contact yourself
- An itemised quotation, not only a package price
A turnkey solution, where one provider handles equipment, installation, curriculum and training, can simplify accountability. Check exactly what “turnkey” includes in each proposal, because the term is used loosely.
Planning a robotics lab for your school? Share your target grades, learning goals, space and budget with RoboGenius, and request a tailored lab proposal.
Step 6 — Plan Teacher Training and Curriculum Delivery
Teachers decide whether a lab is used. Most schools do not need robotics specialists to start, but they do need a plan to build teacher confidence.
- Onboarding: hands-on training on the specific kits and software, ideally before students arrive.
- Lesson plans: ready-to-use, sequenced lessons that teachers can adapt rather than write from scratch.
- Project progression: a clear path from guided activities to open-ended projects across the year.
- Assessment rubrics: criteria for design process, coding, teamwork and presentation, not only whether the robot worked.
- Timetabling: fixed lab periods, so robotics is not the first thing dropped before exams.
- Ongoing professional development: refresher sessions, new project ideas and peer learning between teachers.
- Support after launch: a named contact for academic and technical questions during the first term.
Train at least two teachers where possible, so the programme does not depend on one person.
Step 7 — Implement, Test and Launch the Lab
A sensible robotics lab installation for schools follows a clear sequence:
- Confirm requirements from your Step 1 brief.
- Design the lab: layout, equipment list, curriculum map and training plan.
- Procure against an itemised, agreed scope.
- Install and set up furniture, storage, power points, devices and software
- Test every kit, controller and device, and record the inventory.
- Orient teachers on equipment, lessons, safety and routines.
- Run pilot sessions with one or two sections.
- Collect feedback from teachers and students, then adjust.
- Launch across the planned grades, ideally with a student showcase for parents.
Timelines vary with scope, procurement processes, infrastructure work and provider arrangements. Agree a written schedule with your provider rather than assuming a standard duration.
Step 8 — Maintain the Lab and Measure Its Value
A lab’s value shows up over years, not at the inauguration. Build maintenance and review into the plan from day one.
Maintenance routines
- Check kit completeness after each session or each week.
- Keep a budget line for consumables and replacement parts.
- Log faults and repairs, and track how quickly they are resolved.
- Update software and firmware on a schedule.
- Store projects safely, so students can continue work across sessions.
Practical indicators to review each term
- Lab sessions held compared with sessions timetabled
- Number of students and sections using the lab.
- Share of the planned curriculum delivered.
- Projects completed and showcased.
- Teacher confidence, measured through a short self-assessment.
- Student participation in clubs, exhibitions or competitions.
- Equipment availability: share of kits complete and working.
These indicators will not prove learning outcomes on their own, but they show whether the lab is being used as intended and where to act.
How Much Does a Robotics Lab Cost for a School in India?
There is no single robotics lab setup cost in India, because no two labs have the same scope. Two schools asking for “a robotics lab” can need very different budgets. The main cost drivers are:
- Number of grades, sections and students using the lab at once.
- Number and type of kits, from beginner construction sets to advanced microcontroller platforms.
- Whether new computers or tablets are needed, or existing devices can be reused.
- Furniture, storage and any civil or electrical work.
- Software licences and curriculum resources.
- Consumables for projects.
- Teacher training and ongoing professional development.
- Installation, maintenance, warranty and support terms.
As a public reference point, the government’s Atal Tinkering Lab (ATL) scheme provides selected schools a grant of up to ₹20 lakh over a maximum of five years: ₹10 lakh for capital expenses and ₹10 lakh for operations and maintenance (Atal Innovation Mission, ATL Teacher Book). An ATL is a broader tinkering lab, not only a robotics lab, and selection follows the Atal Innovation Mission’s own process, so check aim.gov.in for current eligibility and open calls. The split is also a useful reminder that running costs continue well after setup.
Questions to answer before you request a quote
- Which grades and how many sections will use the lab in year one, and in year three?
- How many students per session, and how many students per kit?
- Will robotics be timetabled, an elective, a club, or a mix?
- Which devices do you already have, and what condition are they in?
- Is the room ready, or does it need furniture, storage or electrical work?
- Do you need curriculum and lesson plans, or only equipment?
- How many teachers need training?
- What level of maintenance and support do you expect, and for how many years?
- Is funding from fees, the school budget, a CSR partner or a government scheme? Each may bring its own procurement rules.
Share these answers with every shortlisted provider, so quotations are comparable.
Common Mistakes to Avoid When Setting Up a Robotics Lab
| Mistake | Why it hurts | How to prevent it |
| Buying equipment before defining outcomes | Kits may not match grades or curriculum | Write the Step 1 brief first |
| Overlooking teacher readiness | Lab sits unused or becomes demonstration-only | Budget for training and post-launch support |
| Choosing on lowest upfront price alone | Fragile kits, missing curriculum, poor support | Compare total cost over several years |
| Underestimating maintenance | Incomplete kits and broken parts reduce usable sets | Keep an inventory routine and a consumables budget |
| Ignoring grade progression | Students repeat the same activities each year | Map a grade-wise pathway (Step 3) |
| Failing to plan utilisation | Robotics periods are dropped under exam pressure | Fix lab periods in the timetable and track sessions held |
Robotics Lab Setup Checklist for School Management
Save or share this checklist with your principal, trustees and procurement team.
- Learning objectives and target grades agreed
- Student numbers, session frequency and timetable slots confirmed
- Budget range and funding source identified
- Room selected; layout, storage, power and connectivity assessed
- Safety rules and supervision plan written
- Grade-wise learning pathway drafted
- Equipment list matched to the pathway
- At least three providers compared on the vendor checklist
- Sample kits tested by a teacher
- Itemised quotation, warranty and support terms agreed in writing
- Teachers named and training scheduled
- Installation, testing and inventory completed
- Pilot sessions run and feedback collected
- Launch and student showcase planned
- Termly review of usage, maintenance and teacher confidence scheduled
Frequently Asked Questions
How do we start a robotics lab in a school?
Start by agreeing which grades will use the lab and what students should be able to do by the end of each year. Then assess your space, map a grade-wise pathway, and only then choose equipment and a provider. Pilot with a few sections before a full launch.
What equipment is needed for a school robotics lab?
Most labs need age-appropriate robotics kits, controllers, sensors and motors, coding software, devices to program on, storage, and teacher guides with a curriculum. Electronics, consumables and project materials are added for older grades. The exact list depends on your grades and objectives.
Which grades can use a robotics lab?
Students from primary school onwards can benefit when activities match their age, from simple building and sequencing to programmable robots and electronics in later grades. NEP 2020 introduces coding in Grades 6–8, which many schools use as a natural anchor for structured robotics.
How much space does a robotics lab need?
There is no universal requirement. Size the room for your largest group working in small teams, with space to test robots, lockable storage and safe access to power. Many schools adapt an existing computer or science room.
Do teachers need prior robotics experience?
Not necessarily. Teachers with a science, mathematics or computer background often adapt well with hands-on training, structured lesson plans and support after launch. Training two or more teachers reduces dependence on one person.
What affects the cost of a robotics lab?
Cost depends on the number of students and grades, the type and quantity of kits, whether devices and furniture are needed, curriculum and software, teacher training, installation, and multi-year maintenance and support. A tailored quotation based on your requirements is the only reliable figure.
What should a school check before choosing a lab provider?
Check kit quality with a physical sample, curriculum fit for your board, spare-part availability, warranty terms, the training and support included, and references from comparable schools. Ask for an itemised quotation so you know exactly what you are paying for.
Conclusion — Plan a Robotics Lab Around Learning Outcomes
A successful robotics lab is a learning programme first and a room second. Define what students should achieve, prepare a safe and practical space, map a pathway across grades, and choose equipment that serves that pathway. Then select a partner who will train your teachers and support the lab long after installation, and review usage every term.
Get those decisions right and the lab becomes part of how your school teaches, not a facility shown only on open days.
Ready to plan your school’s robotics lab? Talk to RoboGenius about your grades, learning goals, space and budget, and we will prepare a tailored lab proposal.